Showing posts with label crazy quilt seam treatments. Show all posts

Monday, March 25, 2019

Never Ending Sampler Panel 5 Band 5

I'm seeing some pretty fast stitcher's over on the Facebook group:

https://www.facebook.com/groups/Neverendingstitchalong/

So....here is Panel 5 Band 5 of the Never Ending Sampler:


2 different Satin stitch leaves are the feature for this border.  They stitch up quickly and are fun to do!!


Monday, March 12, 2018

Never Ending Sampler Panel 3 Band 8

Today I have Band 8 for Panel 3 of the Never Ending Sampler Stitch Along Project:

Here is band 3 by itself:

This band is worked entirely with straight stitches.  As always, feel free to add beads if you like.

Here it is with the Band 7 overlap:

While I'm at it, if you're stitching on this project, could you please leave a comment and let me know? I'm trying to determine how many people are still interested in this.  Thanks!


Sunday, March 04, 2018

Never Ending Sampler - Panel 3 Band 7

Today, I have the next installment of the Never Ending Sampler for you!

Here is the entire sampler so far:

And here is Band 7 by itself:

This is band is worked simply with straight stitches.  You can add beads to the points of the little leaves if you like.

Here is it is with the band 6 overlap for placement purposes:

Crazy Quilters - Don't forget you can use these bands for crazy quilt seam treatments!!!!


Friday, June 09, 2017

Never Ending Sampler Panel 2 Band 11

It's going to be a hot weekend!  Here's Band 11 of Panel 2 of the Never Ending Sampler Stitch Along.

First the entire sampler so far:

And here is Band 11 by itself:

And finally, with the Band 10 overlap for placement purposes:

This border is worked with backstitching, cross stitches and satin stitches.  Here's a closeup of the shamrock:

Have a great weekend!  Stay cool!!!


Monday, March 20, 2017

Never Ending Sampler Panel 2 Band 1

I hope everyone is caught up on Panel 1 of the Never Ending Sampler Stitch Along.  And I hope ya'll are enjoying this project!  If you're new to this stitch along, click the link above to get started with Panel 1.

As I mentioned last week, I needed a little break due to the stress of my husband's cancer treatment and other things that seem to constantly make their way to my plate.

So now that I feel a little more caught up on things, I've started on Panel 2.  Here is Band #1:

I'm very eager to see how everyone interprets this band.  I worked it all in black so that you can decide for yourself what you want to do with it.  My only suggestion is to think in terms of an antique sampler.  There are flowers, birds, leaves and a little vase or urn.  This band is worked entirely in cross stitch so just think "antique sampler" and I'm sure ya'll will come up with some beautiful color combinations!

Be sure to post your stitching photos over on our Never Ending Sampler Facebook Group!

Thursday, February 16, 2017

Never Ending Sampler Panel 1 Band 20

Panel 1 of the Never Ending Sampler Stitch Along is complete with this, Band #20.  Here is the complete sampler:

And here is the final Band, #20:

This border is to be worked with Cross Stitches, Backstitches and the Blanket Stitch.  If you're not familiar with the Blanket Stitch, please visit Sharon B's Stitch Dictionary for instructions.

Here is the overlap with Band #19 for placement purposes:

I'll give ya'll a little time to get caught up before we start on Panel 2 which will begin sometime next week.  Have a good weekend everyone!


Thursday, February 09, 2017

Never Ending Sampler Panel 1 - Band 18

Today's band is a nice alphabet.  If anyone wants to personalize their samplers at any point, this is pretty alphabet to use.  And who knows, there might be a few verses down the road!! 

Here is the entire sampler so far:

And here is Band #18:


And here it is again with the Band #17 overlap:

I will have band 19 next week along with an undate on my husband and an update on my McHenry Quilt.  Have a nice weekend everyone!


Wednesday, February 01, 2017

Never Ending Sampler Stitch Along Panel 1 Band 16

Today, I have Band #16 of the Never Ending Sampler Stitch-Along for you.

Here is the entire sampler so far:

And here is Band #16 by itself:

Work the trees with straight stitches and the stars with Eyelet Stitches.  If you need help working the Eyelet Stitch, please visit Sharon B's Stitch Dictionary.

For placement purposes, this is Band #16 with the overlap of #15:

Happy Stitching!!!


Tuesday, December 13, 2016

Never Ending Sampler Stitch Along Panel 1 Band 8

I spent 2 days shoveling snow here!  So I guess I have snowflakes floating around in my brain!  LOL!!!

Here is Band #8 of the Never Ending Sampler Stitching Along:

Work the stars on Band #8 with Eyelet stitches.  If you need instructions on how to work that stitch or any other stitch, hop over to Sharon B's Pintangle blog.  She has a wonderful Stitch Dictionary.

Wednesday, December 07, 2016

Never Ending Sampler Panel 1 Band 5

The 5th band for Panel 1 of the Never Ending Sampler Stitching Along features the Herringbone Stitch:

If you need instructions on how to work the Herringbone stitch and any other stitch you can think of, please visit Sharon B's Stitch Dictionary over on her Pintangle blog.

Saturday, December 03, 2016

Never Ending Sampler Stitch-Along Panel 1 Band 3

Okay ladies, here is Band 3 of the Never Ending Sampler Stitch-Along:
Band 3 - the stars are Double Cross Stitches, sometimes called Smyrna Cross Stitches.

I'll give ya'll a few days to get caught up.  Look for Band 4 next week.

Sunday, August 28, 2016

Crazy Memento Quilt Block #8

I still have quite a few blocks for my Crazy Memento Quilt to share with you.  After finishing up the Winter issue of Crazy Quilt Quarterly magazine, I needed a little break from the computer but now I can get back to posting these little 6 inch blocks.  This is Block #8:

You probably already know that I just love seascapes!  This block was inspired by the little silver fish at the bottom.  It's a brooch that my husband bought for me a few years ago.  He also bought me the little seahorse in the upper left-hand corner.  I think he found it at a little antique shop in Kentucky when we were there a few years ago.

The small goldfish were a gift from my dear friend Lula.  I still have some in different colors and I'd like to try to use them all on this quilt.

I hand tatted the little orange dangly things.

Click on the photo to enlarge it and be sure to look closely at the seam treatments.  All are worked with my waste canvas technique.

Wednesday, February 10, 2016

Crazy Quilt Seam Embroidery

I haven't been doing much in the way of stitching lately.  I've taken some time to work on my family tree and I've been having a great time with that despite being so incredibly stuck on my 3rd great grandmother!

I've also taken some time to do some reading.  There's been a lot of books on my "want to read" list so every afternoon around 3:30, I make a cup of tea and read a few chapters.

I love history so my current read is "Killing Lincoln" by Bill O'Reilly.  This also helps to put me in the 1800's "state of mind" which is where I'm focused right now on the family tree. 

In thinking about when I get back to stitching, I thought I'd start working up a few seam treatment patterns.  Most of you know that I mostly use Waste Canvas to embroider the seams on my crazy quilts and when I get a bee in my bonnet about some new ones, I chart them out on my computer.

For today, I have 3 flower borders that I thought I would share here in case I have any waste canvas girls out there!

Right click on the image and save to your computer then print it up and enjoy!  If you use these, please send me photos!!!  I may include them in an upcoming issue of Crazy Quilt Quarterly Magazine!

Tuesday, July 30, 2013

New Crazy Quilt Project

I spent some time with my sewing machine this morning and did the finishing on a few projects so I expect to have some photos of completed things to share tomorrow.

I also started on a new crazy quilt block.  I'm not sure what I'll do with this but I pieced the block awhile back and have been wanting to stitch it:

Here's a closeup of the silk ribbon embroidery on the hat:

And a closeup of this border worked with Sharon B's templates:


I also wanted to mention that we're offering Elegant Cross Stitch Sentiments For Crazy Quilting at a special sale price:

For a limited time, it's available for $24.95!


Sunday, July 28, 2013

Sharon B's Stencils

I wanted to share with you a new tool for Crazy Quilting.  In case you've never been to Sharon B's blog, Pintangle, Sharon is a master crazy quilter who lives in Australia.  She's been stitching and teaching for many, many years and has recently released a wonderful set of stencils for marking crazy quilts:

I'm not going to post a ton of Sharon's photos here.  Just this one.  I'll let you hop over and check out Sharon B's Stencils for yourself. 

I just received mine on Friday and have already used them to create several borders:


I'm currently working on small projects so I haven't been able to experiment too much yet.  But I will be!  These stencils are awesome! 

In other news, here are a couple of new photos of my baby kitties:

I tried to get a new photo of Cotton but he still has that eye infection and I think the flash hurts his eyes.  Cotton and Wrigley are best friends, as you can see in this photo!


Friday, October 05, 2012

Elegant Crazy Quilt Seam Treatments Volume 3

I'm pleased to announce that Volume 3 of Elegant Crazy Quilt Seam Treatments is now available:

I've done another 180 all new charted borders for stitching crazy quilt seams with my Waste Canvas technique.  Please note, there are no directions in this volume.  Full directions for working with Waste Canvas are available in Volume 1

Here is my latest project using the borders from my latest volume:

And here is another photo of the same borders with the beads:


Be sure to click on the photos so you can see the borders closeup!


Thursday, September 27, 2012

Another Sneak Peek

Volume 3 of Elegant Crazy Quilt Seam Treatments is coming along nicely.  I have 10 more pages to do with 6 borders per page.  Here's a sneak peek at a couple more borders:


And here they are beaded:


And here is the stitched project:

Once I get a few more things stitched up, I'll need another sewing day!

Saturday, January 14, 2012

Crazy Quilting and Waste Canvas

I've received several emails recently regarding my use of Waste Canvas and stitching the seam embroidery on crazy quilts.  One of the big concerns is that the manufacturers packaging recommends wetting the waste canvas to pull it out after the stitching is completed.

Wetting the waste canvas is not necessary and I do not recommend it for crazy quilting.

Waste canvas was designed years ago for working charted patterns on non-cross stitch fabric such as sweatshirts and tee shirts. 

As many of my long time blog followers know, I am a retired professional counted cross stitch designer.  I worked with many magazines and manufacturers such as The DMC Corporation, Bucilla, Kreinik and Zweigart

I discovered modern crazy quilting about 10 years ago but struggled with keeping my seam embroidery evenly sized and spaced.  I decided to apply my cross stitch skills to crazy quilting and tried using waste canvas for my seam embroidery.  I was so pleased with the results that I eventually put the directions together in my Elegant Crazy Quilt Seam Treatments book and offered it as a PDF file download.

This book contains complete directions for working with waste canvas on crazy quilts. 

Early in 2011, I released Volume 2 of Elegant Crazy Quilt Seam Treatments which is also still available and contains another 180 charted patterns for crazy quilt seam embroidery.  There are however, no directions in Volume 2.  Only patterns.


Back to my discussion of working with waste canvas, the reason I don't recommend wetting the waste canvas is first, because in crazy quilting, we use many non-washable fabrics and we also use many hand-dyed threads and fibers that aren't washable.  If these fabrics and threads get wet, thread colors may bleed and fabrics might be damaged.

8.5 count waste canvas and 10 count waste canvas threads pull out very easily from beneath the stitching without wetting it.  The trick is to pull the excess waste canvas threads out, from around the outside of the stitched area first.  Then, pull all the short (width) threads out from underneath the stitches and finally, the long (lengthwise) waste canvas threads will pull out very easily.

Waste canvas will only allow you to pull out one thread at a time so don't get in a hurry with it.  Patience is necessary but the results are very worth the little bit of extra time it takes to use it.  If you find you have a stubborn waste canvas thread, get yourself a pair of tweezers, grab the waste canvas thread as close to stitching as you can (without grabbing any of your stitches) and give it a gentle pull and it should release for you.  If you're waste canvas thread breaks underneath your stitches, do not panic!  Try pulling it out from the other side.  If that doesn't work, try pulling the waste canvas threads out from another direction.

Honestly, it's much easier than you think.  It probably sounds complicated and fussy but it really isn't!  It's actually a lot of fun! 

I am pleased to announce that there will be an Elegant Crazy Quilt Seam Treatments Volume 3 coming later in 2012.  It will contain yet another 180 charted borders for crazy quilting and cross stitch samplers. 

With all that said, working crazy quilt embroidery with waste canvas and charted borders opens a whole new world of seam treatment options!  The possibilities for unique, embroidered borders are endless!

Both books are available only as PDF downloads.  I send the files manually within 24 hours of receiving an order.  Shipping fees are refunded via PayPal, also within 24 hours.

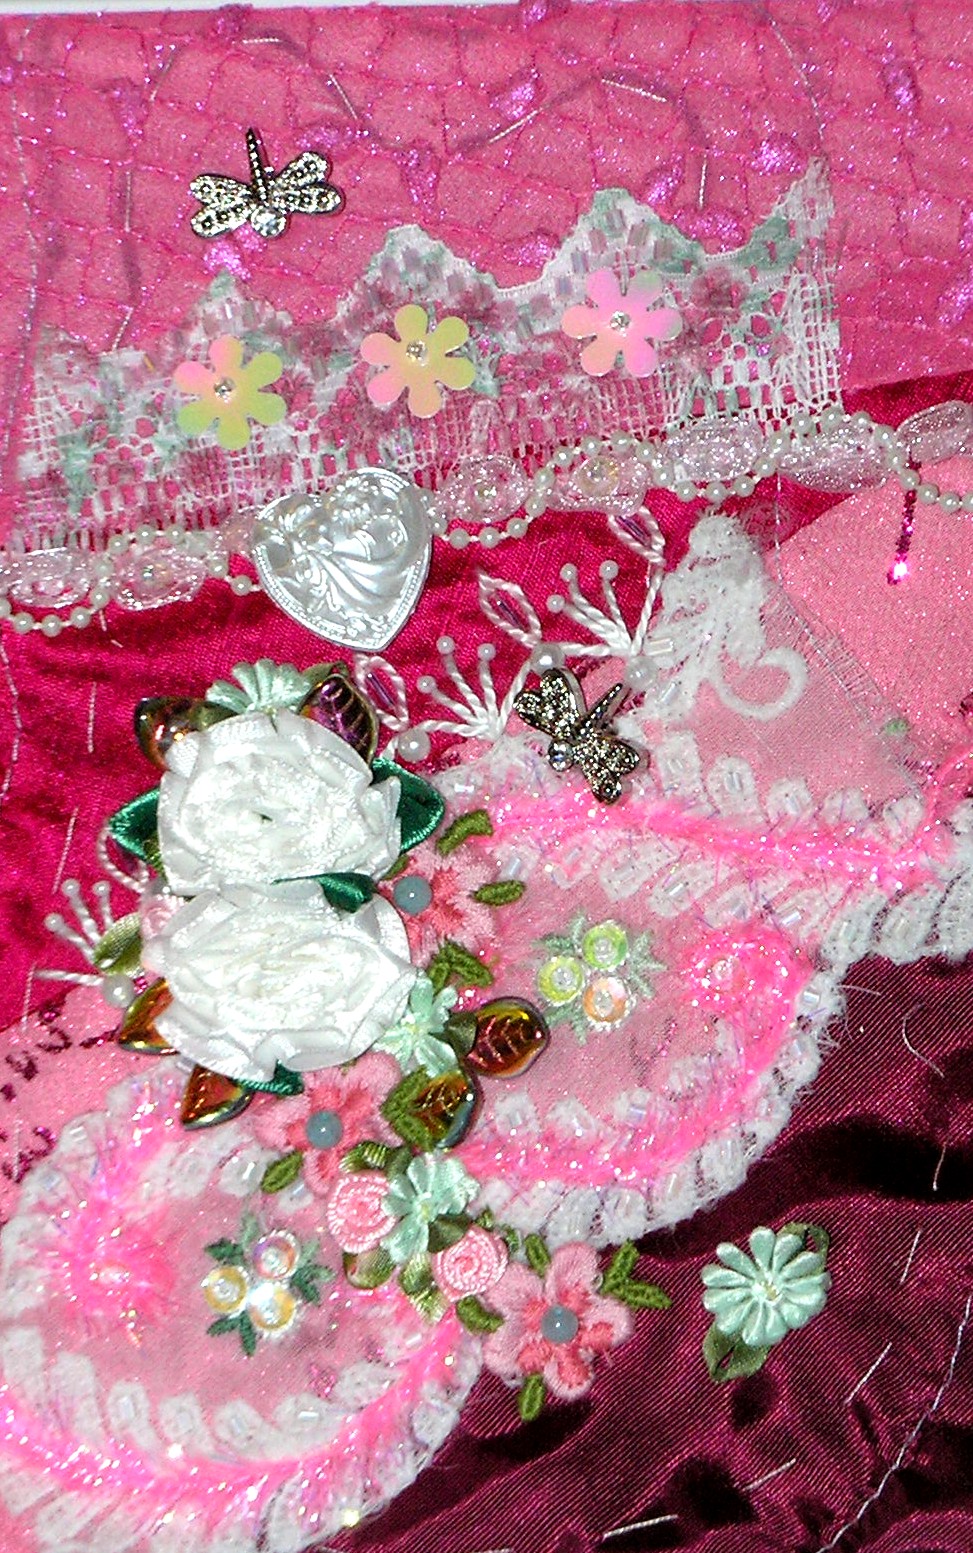
Before I run into town for errands, here is the progress on my latest Crazy Quilt Cat Doll:

Tuesday, January 03, 2012

Handmade Valentines

Busy day yesterday!  I went through some old paperwork and weeded out a ton of stuff.  I had tax stuff going back to 1997!  Needless to say, I sat with my shredder for over an hour and got rid of what was no longer necessary to keep.  That felt good!

I also finished up on my little pink Valentine Cat Doll:

It's very pink, isn't it?  And here is the seam treatment close up:

Be sure to see my Crazy Quilt Seam Treatment Inspiration photos here.

I'll get this litter of Valentine Cat Dolls sewn up in the next day or so.  They never look like much until they're all put together!

I also added some new Valentine Door Pillows to the shop.  Mom made these from vintage linens:


I still have a bunch of our Glitter Cards to list.  We made them before Christmas but I just didn't have time to add them until now.  I'll do that this afternoon.

For today, I have some errands to run.  I'll stop over at mom's and have some coffee with her and then go from there! 

Add This To

Related Posts with Thumbnails