
Cross Stitch Patterns inspired by nature, animals, holidays and scripture by Pamela Kellogg
Tuesday, December 06, 2005
Crazy Quilt Online Course
For those of you interested in learning how to crazy quilt, Sharon B. is offering a 6 week online course. Enrollments are now open here.
Monday, December 05, 2005
The Red Hat Crazy Quilt Completed
Today, I thought you'd like to see the Red Hat quilt which was finished in the same manner as the Victorian Poinsettia quilt.

And here is the quilt label:

And here is the quilt label:
Sunday, December 04, 2005
The Victorian Poinsettia Quilt Completed
One of the things I was trying to complete during my absence, was the Victorian Poinsettia quilt.

As you can see, I bordered it with a red fabric and then a lace border around the block. The lace had to be sewn on by hand which is very time consuming. I bound the edges with a different red print, one that had some metallic gold on it. The binding is sewn onto the front of the quilt by machine but on the back, it is handsewn on with blind stitching. Again, rather time consuming.

Finally, I added my quilt label and finished it off with a pretty trim, again, all sewn on by hand.
As you can see, I bordered it with a red fabric and then a lace border around the block. The lace had to be sewn on by hand which is very time consuming. I bound the edges with a different red print, one that had some metallic gold on it. The binding is sewn onto the front of the quilt by machine but on the back, it is handsewn on with blind stitching. Again, rather time consuming.
Finally, I added my quilt label and finished it off with a pretty trim, again, all sewn on by hand.
Saturday, December 03, 2005
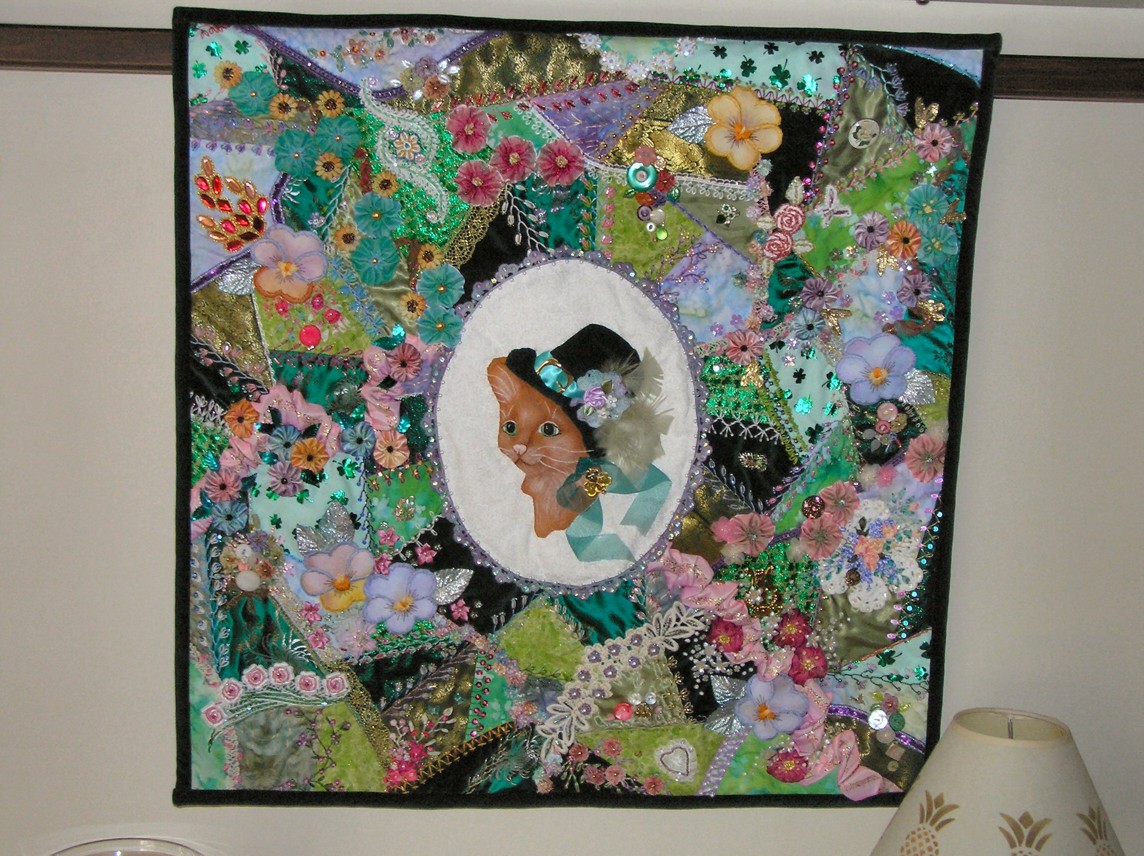
The "Lucky" Quilt
I apologize for disappearing for such a long period of time. Been caught up in holidays and such, trying to get things completed and out of my way so I can get back to my work. If I disappear again, it'll probably be the same thing. But as you all know, things should settle down come January.
Hopefully today's post will make your wait for my return worthwhile!
Earlier this year, I started a quilt based on one of my cross stitch designs titled, "Patrick". It was a small complimentary design but always one of my favorites.

I'm particularly fond of St. Patrick's Day. Not sure why, I've got a few ounces of Irish in me but not alot. I think I just like the whole "shamrock and green" thing. St. Patrick's Day marks the beginning of Spring here in the US and Spring is my absolute favorite time of year!
I wanted to do a larqe wholecloth crazy quilt, with a cat in a hat and the shamrock theme. So I based my cat idea on my Patrick cross stitch design. I knew I wanted him in an oval in the middle of the quilt with crazy patch around him. What a challenge!
I first cut my foundation fabric and then marked the center where the oval would be. I then did my foundation piecing around the outside.
My fabrics include, velveteen, brocades, cottons, satins, foiled netting and batiks. Once I had the foundation piecing completed, I focused on the cat.

The cat and the hat are hand appliqued as is the ribbon. My mother gave me a buckle from her stash and she crocheted the shamrock on the hat which I then hand dyed. I embellished it with a satin flower, some small white flower buttons and real green feathers. Those are tricky to sew on!
The next thing I did with the cat was to hand color him. I used oil pastels to give him some fur and highlights, working in layers and heat setting as I went along with my iron. Then I embroidered his little face. This was mostly done freehand except for marking where the eyes, nose and mouth belonged. I then embroidered the whiskers and foo-foo hairs. Last but not least, I added the organza type ribbon, tacking it in place along the edges with blind stitches. The shamrock charm is vintage. I found it in April at a quilt show in a booth that carried antique and vintage embellishments. It was perfect!
I then put the cat to the side and embellished the quilt. It took me 3 months! I loved every minute of it! I made the pansies from a canvas type fabric using the pattern in one of Judith Montano's books. There are a ton of ribbon flowers on here which I did while housesitting for my sister. The silver leaves are actually hand dyed, half purple, half green. It may be a bit hard to see here but it shows well in person.
This quilt is loaded with beads, new and vintage buttons, charms, vintage jewelry pieces, ribbon, yarn and ribbon embroidery. I used the feather stitch on many of the seams mostly because it's my favorite stitch but there are a few others as well.
When the embellishing was complete, I used a basting spray to hold some quilt batting in place behind the oval with the cat. I then hand appliqued that in place and added some vintage lace that I hand dyed around the outside and embellished that with sequins and beads.
At this point, all that was left was the finishing. I layered it with quilt batting and a backing fabric of a dark green cotton and used the green velveteen for the binding. I tacked all three layers with buttons on the back and added my quilt label. The finished size is 29 inches square. And here is the completed quilt:

To see a larger photo of "Lucky", please click here. To see a few more photos of this quilt, visit my Flickr photo album here.
Hopefully today's post will make your wait for my return worthwhile!
Earlier this year, I started a quilt based on one of my cross stitch designs titled, "Patrick". It was a small complimentary design but always one of my favorites.
I'm particularly fond of St. Patrick's Day. Not sure why, I've got a few ounces of Irish in me but not alot. I think I just like the whole "shamrock and green" thing. St. Patrick's Day marks the beginning of Spring here in the US and Spring is my absolute favorite time of year!
I wanted to do a larqe wholecloth crazy quilt, with a cat in a hat and the shamrock theme. So I based my cat idea on my Patrick cross stitch design. I knew I wanted him in an oval in the middle of the quilt with crazy patch around him. What a challenge!
I first cut my foundation fabric and then marked the center where the oval would be. I then did my foundation piecing around the outside.
My fabrics include, velveteen, brocades, cottons, satins, foiled netting and batiks. Once I had the foundation piecing completed, I focused on the cat.
The cat and the hat are hand appliqued as is the ribbon. My mother gave me a buckle from her stash and she crocheted the shamrock on the hat which I then hand dyed. I embellished it with a satin flower, some small white flower buttons and real green feathers. Those are tricky to sew on!
The next thing I did with the cat was to hand color him. I used oil pastels to give him some fur and highlights, working in layers and heat setting as I went along with my iron. Then I embroidered his little face. This was mostly done freehand except for marking where the eyes, nose and mouth belonged. I then embroidered the whiskers and foo-foo hairs. Last but not least, I added the organza type ribbon, tacking it in place along the edges with blind stitches. The shamrock charm is vintage. I found it in April at a quilt show in a booth that carried antique and vintage embellishments. It was perfect!
I then put the cat to the side and embellished the quilt. It took me 3 months! I loved every minute of it! I made the pansies from a canvas type fabric using the pattern in one of Judith Montano's books. There are a ton of ribbon flowers on here which I did while housesitting for my sister. The silver leaves are actually hand dyed, half purple, half green. It may be a bit hard to see here but it shows well in person.
This quilt is loaded with beads, new and vintage buttons, charms, vintage jewelry pieces, ribbon, yarn and ribbon embroidery. I used the feather stitch on many of the seams mostly because it's my favorite stitch but there are a few others as well.
When the embellishing was complete, I used a basting spray to hold some quilt batting in place behind the oval with the cat. I then hand appliqued that in place and added some vintage lace that I hand dyed around the outside and embellished that with sequins and beads.
At this point, all that was left was the finishing. I layered it with quilt batting and a backing fabric of a dark green cotton and used the green velveteen for the binding. I tacked all three layers with buttons on the back and added my quilt label. The finished size is 29 inches square. And here is the completed quilt:
To see a larger photo of "Lucky", please click here. To see a few more photos of this quilt, visit my Flickr photo album here.
Sunday, November 20, 2005
More "All That Jazz" Blocks completed!
If you'd like to see more completed "All That Jazz" blocks, visit Linda's Chloe's Place and Sharon's In A Minute Ago blogs. These are gorgeous!
Subscribe to:
Comments (Atom)
